Creating engaging video content is essential for capturing your audience’s attention. But it’s not just about what you say; how you present it matters too. That’s where avatars and voices come in. In this post, we’ll dive into the basics of choosing the right avatars and voices for your videos and show you how Hour One makes this process seamless and fun.
Why Avatars and Voices Matter
Avatars and voices can significantly enhance the impact of your video content. They bring a human touch to your message, making it more relatable and engaging. By using photorealistic avatars and diverse voice options, you can create videos that resonate with your audience on a deeper level.
Benefits of Using Avatars and Voices
- Human Connection: Avatars provide a face to your content, making it more engaging.
- Versatility: Voices and avatars can be tailored to fit different tones, styles, and audiences.
- Professionalism: High-quality avatars and voices lend a polished, professional look to your videos.
- Efficiency: Save time and resources by eliminating the need for a physical studio and crew.
Best Practices for Selecting Avatars and Voices
- Know Your Audience: Choose avatars and voices that resonate with your target audience.
- Match the Message: Ensure the avatar’s appearance and the voice’s tone align with your video’s message.
- Test and Iterate: Don’t be afraid to experiment with different combinations to see what works best.
Choosing the right avatar is simple with Hour One.
Here’s how:
- Access the Avatar Library: Click on the ‘Avatar’ icon in the toolbar on the right-hand side.
- Browse and Choose: Scroll through the library, use the search bar, or apply filters (like age and style) to find your preferred avatar.
- Apply the Avatar: Select the avatar to apply it to all scenes in your video.
For a personalized touch, you can create custom avatars using Hour One’s mobile app or studio-grade Custom Character service.
Setting Emotions and Favorites
- Select Emotion: Click the emotion icon next to your chosen avatar to set their emotion.
- Favorite Avatars: Click the star icon to mark your favorite avatars, making them easier to find later.
Hiding and Showing Avatars
To hide an avatar in a scene:
- Go to the ‘Scene’ Tab: Navigate to the ‘Content’ section.
- Hide the Avatar: Click the eye icon next to the avatar frame. To unhide, click the eye icon with a slash.

Accessing and Selecting Voices
Choosing the right voice is just as easy:
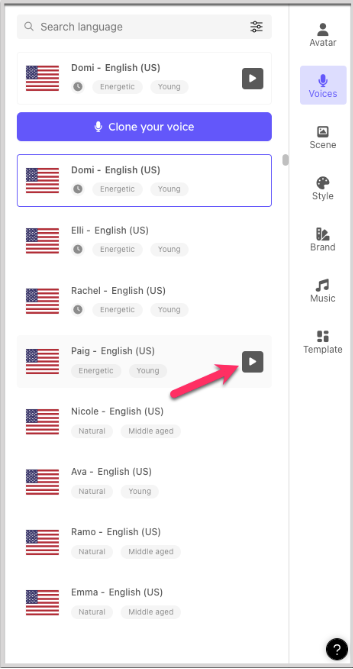
1. Access the Voices Library: Click on the ‘Voices’ icon in the toolbar. Note, you can even clone your voice, depending on your plan.

2. Sample and Select: Hover over voices to sample them and use advanced filters by age or tone.

3. Apply the Voice: Select your preferred voice, which will apply to all scenes.
Adjusting Voice Speed and Pitch
To adjust the voice speed and pitch:
- Go to the ‘Voices’ Tab: Click the slider bars icon next to the selected voice.
- Adjust Settings: Modify the speed and pitch.
- Preview Changes: Click the ‘Listen’ button to hear the adjustments.

Changing the Voice Language
To change the voice language:
- Search for Language: Type the desired language in the search bar above the voices list.
- Match Text Language: Ensure the text language matches the selected voice language for proper functionality.

Using Multiple Avatars and Voices
To enable multiple avatars and voices:
- Activate Options: Turn on ‘Apply avatar per scene’ and ‘Apply voice per scene’.
- Customize Per Scene: Adjust avatars and voices for each scene via the ‘Scene’ tab and ‘Voices’ tab, respectively.

Hour One regularly adds new avatars, languages, and accents. Check the New Features & Updates article for the latest additions.
Conclusion
Using Hour One’s avatars and voices, you can create engaging, professional-quality videos tailored to your specific needs. Start exploring these features today to elevate your video production!


